WordPress Conditional Logic: 7 Simple Rules That Work
In short:
- WordPress conditional logic shows or hides a form field depending on earlier answers, for example “Show Phone if Budget is greater than 500”.
- Every rule has three parts: an action (show or hide), conditions (field, test, value) and a match (all or any).
- Good logic keeps forms short, routes each enquiry to the right person, and never asks for what you do not need.
- Rules must run in the browser and on the server, or hidden fields can still be stored and hidden required fields can block the form.
- In FillKite, conditional logic is free, written as sentences, and warns you about rules that depend on each other in a loop.
WordPress conditional logic is the feature that turns one long, tiring form into a short conversation. Instead of showing every visitor every question, the form asks the next question only when an earlier answer makes it relevant.
This guide explains how WordPress conditional logic works, seven simple rules that cover most real forms, the mistakes that quietly break forms, and how to test everything before you publish. The ideas apply to any form plugin. Where FillKite handles something for you, we say so.
What is WordPress conditional logic?
Conditional logic is a set of rules attached to a form field. Each rule decides whether that field is shown, based on answers the visitor has already given. The rules run as the visitor types, so the form changes in front of them.
Every rule has three parts:
- An action: show this field, or hide it.
- One or more conditions: a field, a test and a value, such as Budget · is greater than · 500.
- A match: the action happens when all of the conditions are true, or when any of them is.
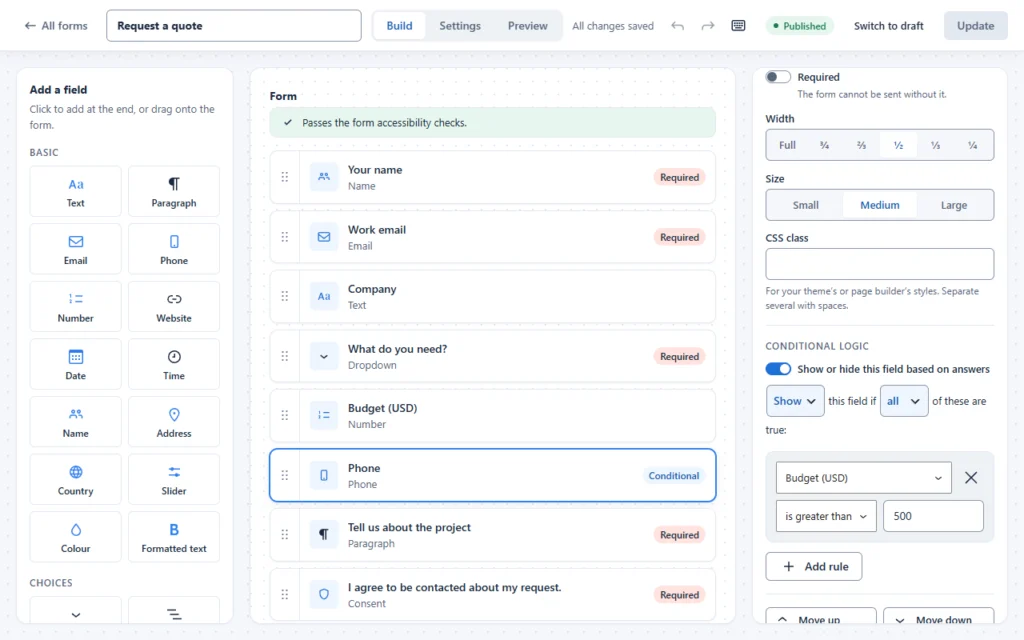
Read together, a rule is just a sentence: Show this field if all of these are true: Budget is greater than 500. That is exactly how FillKite shows WordPress conditional logic in the builder, so you can read a form’s rules out loud and know what it does.
Why WordPress conditional logic matters
Every question you add to a form is a reason for someone to stop. Shorter forms get finished more often, yet many businesses genuinely need different details from different people. WordPress conditional logic resolves that tension: each visitor sees only the questions that apply to them.
There are three more reasons to use it:
- Better data. A visitor who is never shown an irrelevant field cannot fill it with nonsense to get past it.
- Less privacy risk. If you only ask for a phone number when you will actually call, you store less personal data, which is what the GDPR’s data minimisation principle expects.
- One form instead of five. A single enquiry form with WordPress conditional logic can replace separate sales, support and booking forms, which means one place to maintain.
7 simple rules that cover most forms
You do not need complex logic to get most of the benefit. These seven patterns cover the majority of real forms we see.
| # | Use | Rule as a sentence |
|---|---|---|
| 1 | Quote forms | Show Phone if Budget is greater than 500 |
| 2 | Support routing | Show Order number if Topic is Support |
| 3 | Sales qualifying | Show Company size if Topic is Sales |
| 4 | Events | Show Dietary needs if Attending the dinner is checked |
| 5 | Job applications | Show Portfolio link if Role contains Design |
| 6 | Bookings | Show Return date if Trip type is Return |
| 7 | Follow-ups | Show Tell us more if How did you hear about us is Other |
Notice that each rule only adds a follow-up question. The core of the form, name, email and the main question, stays visible for everyone. That is the healthiest way to use WordPress conditional logic.
How to add WordPress conditional logic in FillKite
- Open your form in the builder and click the field you want to show or hide.
- In the field’s settings, find Conditional logic and turn on Show or hide this field based on answers.
- Choose Show or Hide, and whether all or any of the rules must be true.
- Build each rule: pick a field, a condition and a value. Press Add rule for more.
- Open Preview and try the form the way a visitor would.
A field with a rule gets a small “Conditional” badge in the form, so you can see at a glance which fields may not always appear. You never write code, and the rule is saved with the form.
A worked example: one quote form for three kinds of client
Rules are easier to understand in a real form. Imagine a small web studio that gets three kinds of enquiries: new websites, fixes to existing sites, and monthly care plans. Without WordPress conditional logic, they would need three forms or one very long one. With it, they need one form and five rules.
The fields that everyone sees:
- Name, email, and What do you need? with three choices: New website, Fix my site, Care plan.
- A message box and a consent checkbox.
The fields that appear only when they matter:
- Budget, shown if What do you need? is New website.
- Phone, shown if Budget is greater than 5,000. Big projects get a call; small ones get an email.
- Site address, shown if What do you need? is Fix my site or Care plan, using any.
- What is broken?, shown if What do you need? is Fix my site.
- How many sites?, shown if What do you need? is Care plan.
A visitor asking for a fix now sees six fields, not eleven. Someone planning a large new website sees the phone field; someone with a small budget never does. Add two notification rules, new websites to sales and fixes to support, and the studio has replaced three forms with one that sends every enquiry to the right person.
That is the real value of WordPress conditional logic: not clever tricks, but a form that feels made for each visitor.
Plan your rules before you build them
The fastest way to get WordPress conditional logic wrong is to add rules one at a time in the builder until the form seems to work. A few minutes on paper first saves an hour of debugging later.
- List every kind of visitor who will use the form. Usually two to four.
- Write the fields each one needs. Fields every visitor needs have no rules.
- Write each rule as a sentence before you build it: “Show X if Y is Z.”
- Look for chains. If field C depends on B, and B depends on A, check that C still makes sense when A changes.
- Decide who gets each email, and write those rules too.
If a sentence is hard to write, the rule will be hard to maintain. Simplify it before it reaches the form.
The conditions you can use
FillKite offers thirteen conditions. Each field only offers the ones that make sense for it, so you cannot build a rule that could never be true.
| Condition | Works with | Example |
|---|---|---|
| is / is not | Most fields | Topic is Support |
| contains / does not contain | Text fields | Message contains “urgent” |
| starts with | Text fields | Postcode starts with “SW” |
| is greater than / is less than | Numbers, sliders | Budget is greater than 500 |
| is before / is after | Dates | Event date is after 1 June |
| is checked / is not checked | Checkboxes, consent | Attending the dinner is checked |
| is empty / is not empty | Any field | Company is not empty |
Start small. Add one rule, test it in Preview, and only then add the next. Forms built this way rarely surprise anyone, and each rule stays easy to explain to a colleague who edits the form after you.
Choosing “all” or “any”
The match setting is where most confusion with WordPress conditional logic starts. The difference is simple once you say it out loud.
- All means every condition must be true. “Show Call time if all are true: Budget is greater than 500, and Phone is not empty.” Only big budgets with a phone number see it.
- Any means one true condition is enough. “Show Order number if any is true: Topic is Support, or Topic is Returns.” Either topic shows it.
A useful habit: if you catch yourself writing “and” when you describe the rule, choose all. If you say “or”, choose any. Each field has its own rule set, so one form can mix both freely.
WordPress conditional logic after the form is sent
Showing and hiding fields is only half the story. The same idea works after the visitor presses Send.
In FillKite, every notification can have its own rules, so an email goes to sales only when Department is Sales, and to support otherwise. A skipped notification is noted on the entry, so you can always see why someone was or was not told. This is how one form can replace three, without anyone getting emails that are not theirs. If those emails are not arriving at all, our guide to fixing a form not sending email walks through every cause.
Where WordPress conditional logic goes wrong
These mistakes all look fine in the builder and fail in real use.
| Mistake | What happens | How FillKite handles it |
|---|---|---|
| A hidden field is still required | Nobody can send the form | A field the visitor could not see is never checked |
| Rules run only in the browser | Bots and changed answers still store hidden values | Every rule runs again on the server and hidden values are dropped |
| Two rules depend on each other | Neither field ever appears | The builder warns you about the loop |
| The main question is hidden | Visitors leave before they see it | Keep core fields always visible |
| Rules point at a deleted field | A field never shows again | Rules only offer fields that exist |
| Nobody tests every path | One answer leads to a broken form | Try every path in Preview |
The second row deserves attention. A form that hides fields only with JavaScript can still receive values for them, from a bot or from a visitor who filled in a field and then changed an earlier answer. Those values end up in your database and your emails. WordPress conditional logic that runs on both sides closes that gap.
When a rule does not work: a debugging routine
Sooner or later a field will not appear when you expect it to. Before you rebuild anything, run through these checks in order. Almost every broken rule in WordPress conditional logic comes down to one of them.
- Read the rule out loud. “Show this field if all of these are true” with two conditions that can never both be true is the most common fault. Switch to any if you meant “or”.
- Check the exact value. A rule for Topic is Support will not match a choice labelled Support request. Pick the value from the list rather than typing it.
- Check the test. “Contains” matches part of an answer, “is” needs the whole answer. For numbers, make sure the field really is a number field, not a text field holding digits.
- Follow the chain. If the field depends on another field that is itself hidden, it cannot appear until the first one does.
- Try it in Preview, not on a cached public page, so you know you are testing the latest version of the form.
If all five pass and the field still hides, remove the rule, save, and add it again from scratch. Rebuilding one rule takes a minute, and it is quicker than hunting for a typo. Keeping each rule short, with one or two conditions, makes this kind of problem rare.
WordPress conditional logic and accessibility
A form that changes while someone fills it in has to stay usable for people who cannot see the change. Keyboard users and screen reader users rely on the order of the fields, and a field that appears out of nowhere can be missed.
- Put follow-up fields right after the question that reveals them. A field that appears three questions further down is easy to miss for everyone.
- Keep labels complete. “Order number” is clear on its own; “Which one?” is not.
- Do not hide error messages. If a revealed field is required, its error should appear next to it, like any other field.
- Avoid rules on the consent box. Consent should be visible to everyone who is asked for data.
FillKite gives every field a real label and announces errors to screen readers, and its builder checks each form for accessibility problems while you work. Good WordPress conditional logic keeps those promises for every path through the form, not only the first one.
Test before you publish
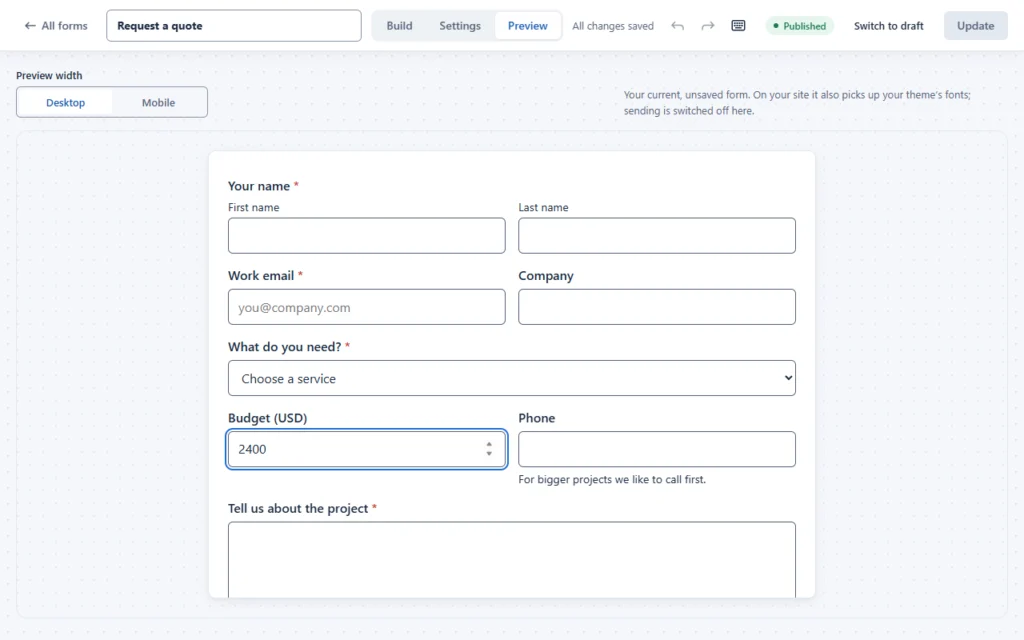
Open the Preview tab and go through each path: every answer that shows or hides something. The preview uses your site’s real form styles, so what you see is what visitors get.
Then send one real entry for each path and open it in the inbox. A hidden field should be absent from the entry, not empty. If it appears, a rule is missing. Finally, check that each notification went only to the people its rules allow.
Switching from another form plugin first? You can import Contact Form 7 forms into FillKite and add rules to them afterwards.
Frequently asked questions
Is WordPress conditional logic free in FillKite?
Yes. Conditional logic is part of the free plugin, with no limit on rules or forms. Many other form plugins keep it for paid plans.
Does WordPress conditional logic slow a form down?
No. In FillKite the rules run inside the same small front-end script, about 11 KB per form, and it only loads on pages with a form.
Are hidden fields saved in the entry?
No. FillKite checks every rule again on the server and drops the values of fields that were hidden, so they are never stored or sent in emails.
Can I use “any” and “all” in the same form?
Yes. Each field has its own rule set, and each rule set chooses whether all or any of its conditions must be true.
How many rules should one form have?
As few as the form needs. Most forms work well with two to five rules. If a form needs more than ten, it is often two different forms that would be clearer on their own, or a multi-step form where each step asks one group of questions.
Do rules still work if I duplicate or import a form?
Yes. In FillKite rules are saved with the form, so a duplicated or exported form keeps them. Check the rules after an import from another plugin, because not every plugin stores logic the same way.
Can WordPress conditional logic send emails to different people?
Yes. In FillKite each notification can have its own rules, so a form can email sales for one answer and support for another.
Build shorter forms with WordPress conditional logic that reads like a sentence. Read the conditional logic guide, see how FillKite keeps logic readable, browse form templates, or join the waitlist to hear the day FillKite is out.