Stripe Payment Form: 6 Simple Steps in WordPress
In short:
- A Stripe payment form collects details and takes a card payment in one step: deposits, event tickets, consultations, donations or simple products.
- The safest setup sends visitors to Stripe’s hosted checkout page to pay, so card details never touch your website.
- Six steps: connect your Stripe account, add a payment field, set the amount, choose one-off or repeating charges, test in Stripe’s test mode, then go live.
- Hold the “new order” emails until the payment succeeds, so you never start work for an unpaid form.
- In FillKite, the Payment field is part of FillKite Pro: fixed prices, pay-what-you-want amounts or a calculated total, once or on a schedule.
A Stripe payment form is the simplest way to take money on a WordPress site without building a full shop. If you sell a handful of services, take deposits for bookings, sell tickets or accept donations, a form that collects the details and the payment together is often all you need.
This guide shows how to set up a Stripe payment form in six simple steps, the options for amounts and subscriptions, how to test safely, and the mistakes that cause failed or missing payments. The examples use FillKite Pro’s Payment field.
A payment form or a shop?
| You sell… | Best fit |
|---|---|
| A few services, deposits or bookings | Stripe payment form |
| Event tickets or course places | Stripe payment form |
| Donations | Stripe payment form with a visitor-entered amount |
| Memberships or retainers | Stripe payment form with a repeating charge |
| Many products with stock and shipping | A shop plugin such as WooCommerce |
A form is lighter and faster to set up than a shop: no product catalogue, cart or shipping rules. You keep all the details you need in one entry, next to the payment.
Why hosted checkout is safer
There are two ways to take a card on a form. The card fields can sit on your own page, or the visitor can be sent to a secure page hosted by the payment provider after they fill in your form. FillKite uses the second: after the form is sent, the visitor pays on Stripe Checkout, then returns to your site.
That has real advantages for a small business. Card numbers never pass through your WordPress site, which keeps your security and compliance burden low. Stripe’s page handles card checks, wallets and bank authentication, and it is kept up to date by Stripe rather than by you.
Stripe payment form examples
Booking deposit
Fields: name, email, phone, preferred date, service, notes. Payment: a fixed £50 deposit, charged once. The Stripe payment form confirms the booking request and the deposit together, and the notification only arrives once the deposit is paid.
Event ticket
Fields: name, email, ticket type, number of tickets, dietary needs. Payment: the total of a calculation field, ticket price times quantity. The visitor sees the total before paying.
Donation
Fields: name, email, optional message, a checkbox for staying anonymous. Payment: the visitor enters the amount, with a small minimum, charged once or monthly. One Stripe payment form covers both one-off and regular gifts.
Monthly retainer
Fields: company, contact name, email, plan chosen. Payment: a fixed price, charged every month as a Stripe subscription. Clients cancel from Stripe’s emails, or you cancel in Stripe.
How to set up a Stripe payment form in 6 simple steps
1. Connect your Stripe account
You need a Stripe account in your business’s name. In FillKite Pro, open FillKite → Integrations and add your Stripe keys. Payments go straight into your own Stripe account, and Stripe pays out to your bank as usual.
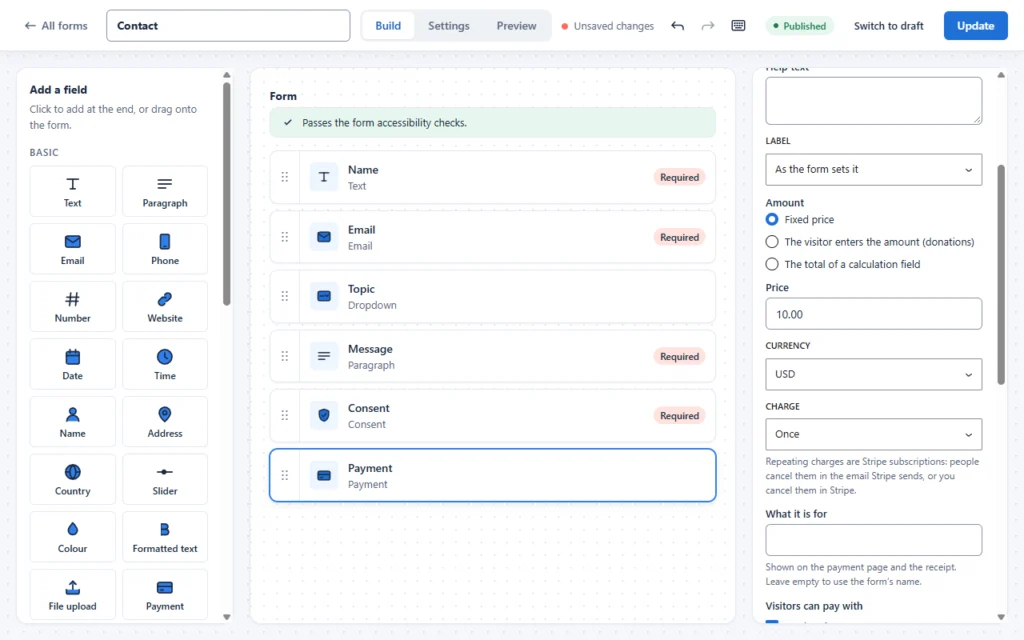
2. Add a Payment field
Open the form in the builder and add a Payment field, usually at the end, after the details you need. The rest of the form works as normal: required fields, conditional logic and consent.
3. Set the amount
The Payment field offers three ways to set the amount:
- Fixed price: the same amount every time, such as a £50 deposit.
- The visitor enters the amount: for donations or “pay what you want”, with an optional smallest amount.
- The total of a calculation field: the price is worked out from the visitor’s answers, such as quantity times price plus options.
Choose the currency, and write What it is for, which appears on the payment page and the receipt.
4. Choose once or repeating
Under Charge, pick Once, or charge every week, month or year. Repeating charges become Stripe subscriptions: customers can cancel from the emails Stripe sends, and you can cancel them in Stripe. This suits memberships, maintenance retainers and monthly donations.
5. Test in Stripe’s test mode
Stripe gives every account test keys and test card numbers. Add the test keys, send the form, pay with a test card, and check three things: the visitor returns to your site, the entry shows as paid, and the notification arrives. Nothing real is charged in test mode.
6. Switch to live keys
Replace the test keys with live keys, send one real payment of a small amount, and refund it in Stripe. Now your Stripe payment form is ready for customers.
What the visitor experiences
From the visitor’s side, your Stripe payment form works in three short moves. They fill in your form on your site, with your design and your questions. They press the button and arrive on Stripe’s checkout page, which shows your business name, what the payment is for and the amount. They pay with a card or wallet and are brought back to your site, where they see your success message or thank-you page.
Make that return feel finished. A thank-you message such as “Payment received, your booking is confirmed for Saturday” reassures people far more than a generic “Thank you”. If you redirect to a thank-you page, repeat what they paid for and what happens next.
Hold emails until the payment succeeds
A form that sends its “new order” email the moment it is submitted can mislead you: the visitor may never finish paying. FillKite holds the notifications for a payment form until the payment succeeds, then sends them. You never start work, book a slot or post a ticket for an unpaid entry. The entry itself is saved from the start, so you can see payments that were abandoned and follow up if you want.
Not only Stripe
Stripe works in many countries, but not everywhere, and some customers prefer other methods. FillKite Pro’s Payment field also supports PayPal and several regional hosted checkouts, such as Mollie, Square, Razorpay, Paystack and Mercado Pago, chosen under Visitors can pay with. The form and entry work the same way whichever the visitor picks.
Prices that depend on answers
When the price depends on choices, such as the number of tickets, a size or add-ons, a calculation field works out the total as the visitor fills in the form. Point the Payment field at that total, and the amount charged always matches what the visitor saw. Show the calculated price clearly next to the button, so there are no surprises on the payment page.
Payments only when they apply
Not every visitor needs to pay. A booking form might charge a deposit only for weekend slots; an event form might have free and paid tickets. Use conditional logic to show the Payment field only when the answers call for it. Visitors who choose the free option simply send the form, and those who choose a paid one continue to Stripe. One Stripe payment form then handles both, with every entry in the same inbox. Our guide to WordPress conditional logic explains how to set the rules.
Cards, wallets and phones
Many visitors pay on a phone, where typing a card number is tedious. Stripe’s checkout page can offer wallets such as Apple Pay and Google Pay, and other local methods, depending on what you enable in your Stripe dashboard and what the visitor’s device supports. Turn on the methods your customers use; a Stripe payment form that offers a one-tap wallet often converts better on mobile than one that asks for a card.
Receipts and records
Stripe can email receipts automatically; turn them on in your Stripe settings. On your side, each entry records its payment, so the inbox shows who has paid. Export entries to CSV or Excel for your accountant, and use Stripe’s own reports for payouts and fees.
Following up unpaid entries
Some visitors fill in the form and then leave the payment page: the card was not to hand, the price surprised them, or they were interrupted. Because FillKite saves the entry before payment, you can see these unpaid entries in the inbox. For deposits and bookings, a short, friendly email the same day often recovers the sale: “We saw you started a booking, would you like us to hold the slot?” Speed matters here as with any lead; see our guide to lead response time.
Only contact people about an unpaid entry when it is expected, such as a booking they started. Do not add them to marketing emails without consent.
Using it with Elementor
If your site is built with Elementor, place the Stripe payment form with the FillKite Form widget, style it from the Style tab, and use the popup option for a “Pay deposit” button on pricing pages. See our guide to the Elementor contact form for how the widget works.
Fees
Stripe charges a processing fee on each payment, which depends on your country and the payment method; check Stripe’s pricing page for your region. Build the fee into your prices rather than adding a surcharge on the form, which many customers dislike and which is restricted in some countries. A Stripe payment form with a clear, all-in price converts better than one that adds charges at the last step.
Tax and invoices
If you need to charge VAT or sales tax, decide whether prices on the form include it, and say so next to the price. Stripe offers tools for tax calculation and invoicing if your situation needs them. For simple cases, a price “including VAT” on the form and Stripe’s receipt are often enough; ask your accountant what your business requires.
Refunds and cancellations
Refunds are handled in your Stripe dashboard: open the payment and refund all or part of it. Write your refund policy near the Stripe payment form, especially for deposits and tickets, so customers know the rules before they pay. For subscriptions, say how to cancel and when the last charge happens. Clear terms prevent most disputes, and disputes cost more than refunds.
Design the form for confidence
- Show the price and currency before the button, not only on the payment page.
- Name the button after the result: “Pay deposit and book” beats “Submit”.
- Explain the next step: “You will pay securely on Stripe, then return here.”
- Keep fields to the minimum you need for the order.
- Link to your terms and refund policy next to the price.
A Stripe payment form that sets expectations clearly has fewer abandoned payments, because nothing on Stripe’s page comes as a surprise.
Accessibility
Every Stripe payment form should be usable by everyone who wants to pay you. On your side, that means real labels, clear errors and a form that works with a keyboard, all of which FillKite provides. On the payment side, Stripe maintains the accessibility of its own checkout page. Test the whole Stripe payment form journey once with only a keyboard, from the first field to the success message, to make sure nothing traps people along the way.
Security checklist
- Visitors pay on Stripe’s hosted page; card details never reach your site.
- Your Stripe secret key is stored only in WordPress settings, never in page content or code shared with others.
- Admin accounts that can see payment settings use strong passwords and two-factor authentication.
- WordPress, your theme and plugins are kept up to date.
- Spam protection is on, so bots cannot start large numbers of checkouts.
After launch
After you launch a Stripe payment form, check your Stripe dashboard and your inbox side by side for the first week. Every paid entry should have a matching payment, and every payment a matching entry. If they differ, look first at the keys and the currency. After that, a monthly glance at unpaid entries shows whether visitors are dropping out at the payment step, which usually points to a price or trust question you can answer on the form.
A Stripe payment form checklist
- Stripe account in your business’s name, with keys added in FillKite Pro.
- Amount set: fixed, visitor-entered or calculated, with the right currency.
- Charge set to once or a repeating schedule.
- Notifications held until payment succeeds.
- Test payment made in test mode, then a small live payment refunded.
- Price, terms and refund policy visible next to the button.
Where a Stripe payment form goes wrong
| Problem | Likely cause | Fix |
|---|---|---|
| “Payment could not start” | Test and live keys mixed up | Use one pair from the same mode |
| Work started for unpaid orders | Emails sent before payment | Hold notifications until paid |
| Wrong amount charged | Price typed separately from the calculation | Charge the calculated total |
| Customers confused by currency | Currency not shown on the form | Show it next to the price |
| Subscriptions nobody can cancel | No clear cancellation route | Explain how, and use Stripe’s emails |
| Spam entries starting checkouts | No spam protection | Keep honeypot and spam score on |
Before you take payments, make sure form emails arrive reliably; our guide to WordPress SMTP covers it. And keep the form short, because every extra field before the payment step costs sales; see form abandonment.
Frequently asked questions
Is a Stripe payment form secure?
With hosted checkout, yes. Visitors pay on Stripe’s own page, so card details never touch your site. Keep WordPress and your plugins updated as usual.
Can I take recurring payments?
Yes. Set Charge to every week, month or year, and FillKite Pro creates a Stripe subscription.
Does the visitor need a Stripe account?
No. They pay with a card or wallet on Stripe’s checkout page without signing up.
Can I use Stripe test mode on a live site?
Yes. Add test keys, make test payments with Stripe’s test cards, then switch to live keys. Remember to switch back before real customers use the form.
Can I let visitors choose the amount?
Yes. Choose “The visitor enters the amount” for donations or pay-what-you-want, with an optional smallest amount.
What if the visitor closes the payment page?
The entry is saved but unpaid, and the order notification is not sent. You can see unpaid entries in the inbox and follow up if it makes sense.
Is the Payment field free in FillKite?
Payments are part of FillKite Pro. The free plugin includes 29 field types, conditional logic, the inbox and spam protection.
Take payments with a form, not a shop. FillKite Pro’s Payment field sends visitors to Stripe’s secure checkout, supports one-off and repeating charges, and holds emails until the payment succeeds. Compare FillKite Pro, see pricing, or install FillKite free from WordPress.org.